About Actions:
- Action Screen
- Creating Actions
- Action Types
- Editing an Action
- Scheduling an Action
- Assigning an Action
- Activating an Action
- Deactivating an Action
- Changing Display Order
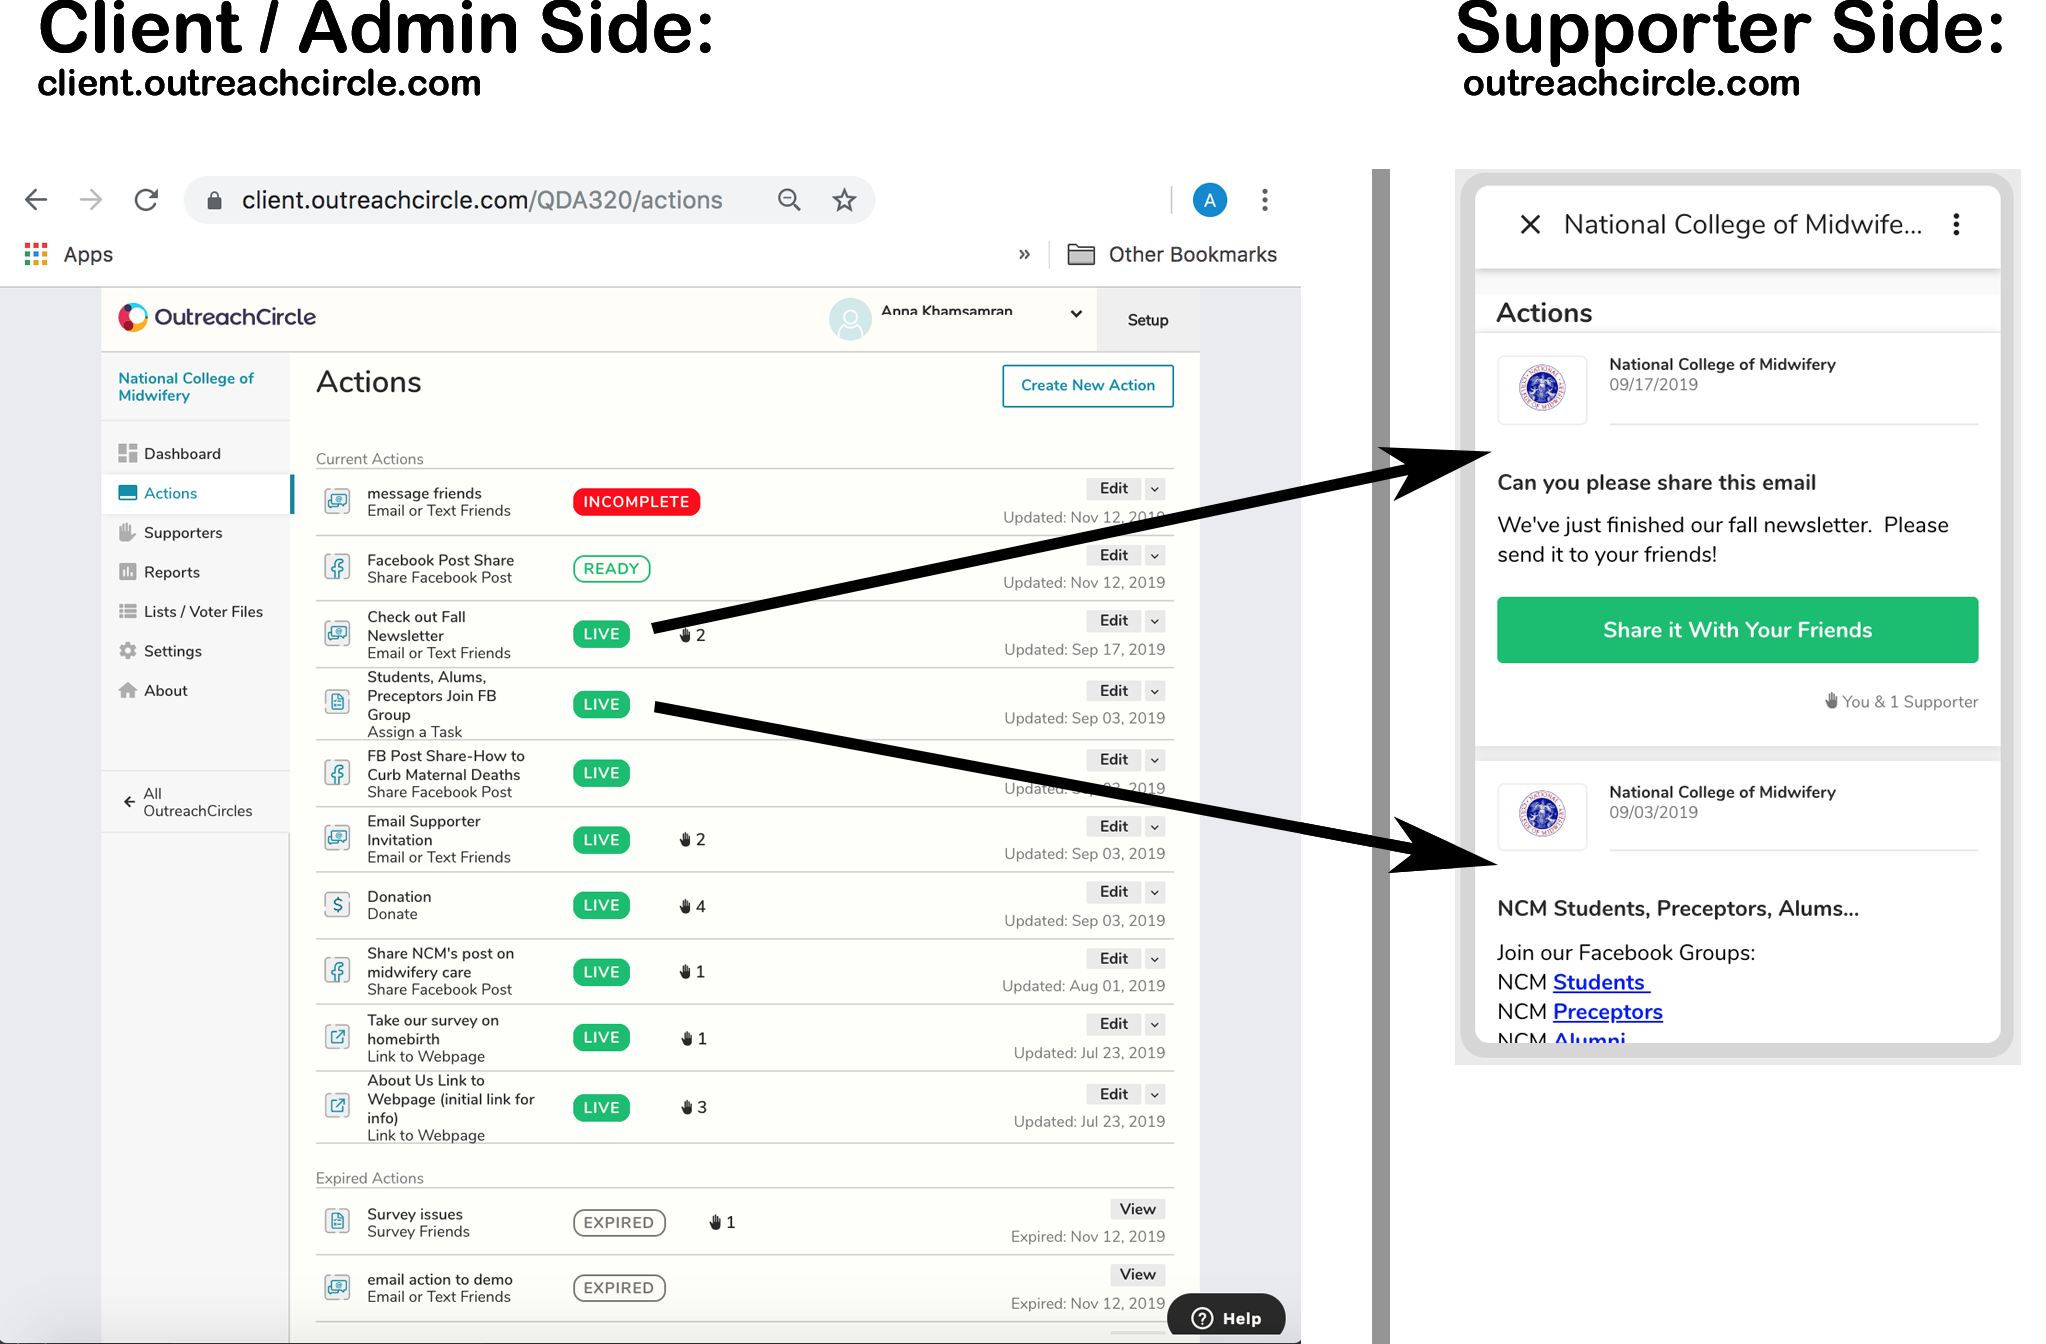
Actions are the heart of OutreachCircle and they are managed on the "Action" Screen. Getting your Supporters completing Actions in your OutreachCircle will keep them engaged with you and will ultimately maximize their value.
Action Screen
- The action screen is where you can manage your actions or create new actions.
- Displays all the actions that belong to the OutreachCircle
- Indicates status of the actions as Active, Ready, Incomplete or Inactive
- The number of supporters who have taken each action
- A reminder can be sent to supporters for active actions. Both active and deactivated actions can be edited, and deactivated actions can be activated again.
- You can copy each action's unique action link to send to your supporters.
- You can also archive inactive or terminated actions.
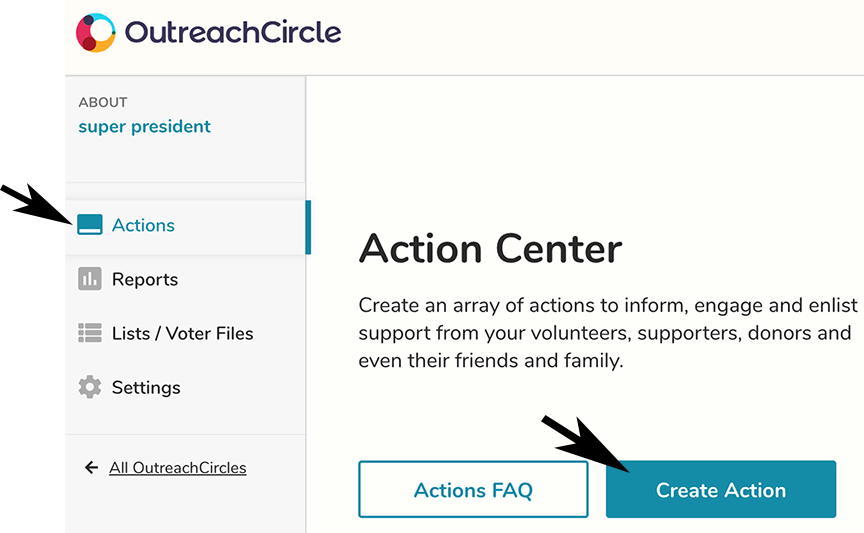
Create an Action
On the Action Screen, click the "Create Action" button. This will start a wizard which will walk you through all the steps to create your Action.
Select an Action type:
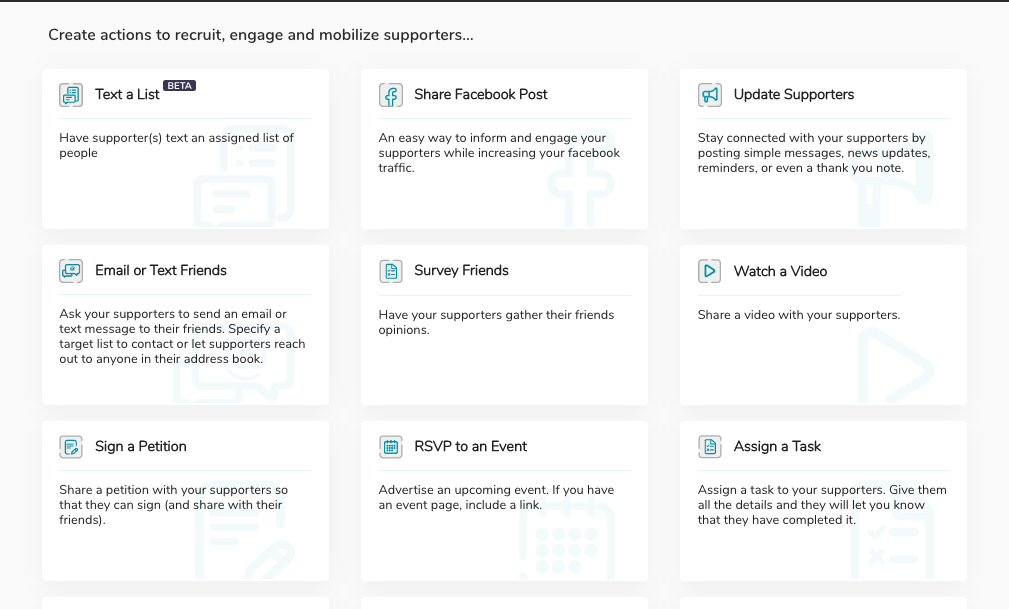
Current Action Types:
- Text a List (Affinity P2P Texting) - Allows Supporters to text an assigned list of contacts from their own phone number
- P2P Texting Actions - Allows Supporters to text an assigned list of contacts from a third-party number
- Social Share Actions – Actions that allow Supporters to share your posts on Facebook and other social media platforms.
- Survey Friends Actions - Asks your Supporters to send a survey through an email or text to their friends.
- Update Supporters – Client creates a message with information, news, etc., for supporters. Optional links allow Supporters to go to your web site or sign up for an event.
- Assign a Task - Ask your Supporters to complete a task and click a button to indicate when they have completed it.
- Email, Text, or Share with Friends - Ask your Supporters to send a message to their friends by email, text, or sharing via another app.
- Actions in OutreachCircle that include for a button to link to a webpage outside of OutreachCircle:
- Link to a Webpage Action - Use this action type to link to an outside website, such as your campaign or cause's website, or it can be used to link directly to a social media post, page or account on Facebook, Twitter, Instagram, Linked-in, etc
- Watch a Video Action - Use this action type to link to a video posted on the internet on YouTube, Vimeo, Facebook, etc
- RSVP to an Event Action - Use this action type to link to your outside events registration page, such as Facebook Events, Mobilize, etc
- Sign a Petition Action - Use this action type to link to an outside petition site such as Change.org, etc
- Ask for a Donation Action - Use this action type to link to an outside fundraising page, such as ActBlue, GoFundMe, etc
- Supporter Forms Actions - Collect feedback, contact information, testimonials and endorsements, etc from your Supporters.
- Phone2Action Advocacy Campaign Actions - Integrate your OutreachCircle with your Phone2Action campaign so Supporters can easily complete actions on both platforms.
- Search and Survey/Canvass Anywhere Actions - Create surveys so your Supporters can canvass anywhere with just their phone or computer.
- All-In-One Canvass Actions - Use this action type to create surveys that your Supporters can use for canvassing by email, text, phone call, or in person.
When you choose an Action, the Wizard leads through setup.
Assigning an Action:
Actions can be open to all your Supporters, assigned to a Group, or assigned to an individual Supporter. They can be assigned to an individual Supporter on the Action Landing Page (the same page where you can schedule and activate Actions). To learn how to assign an Action to a Group, read this FAQ. Actions are open to all Supporters by default.
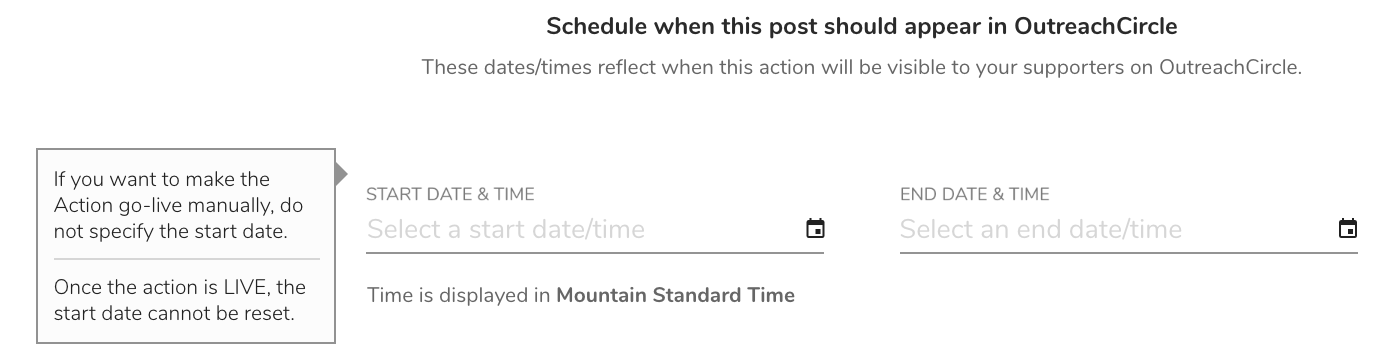
Scheduling an Action:
Complete the Scheduler or leave blank to manually set to activate and deactivate (Scheduler only available in paid accounts) Note: Once an action is activated, you cannot go back and change the Start Date.
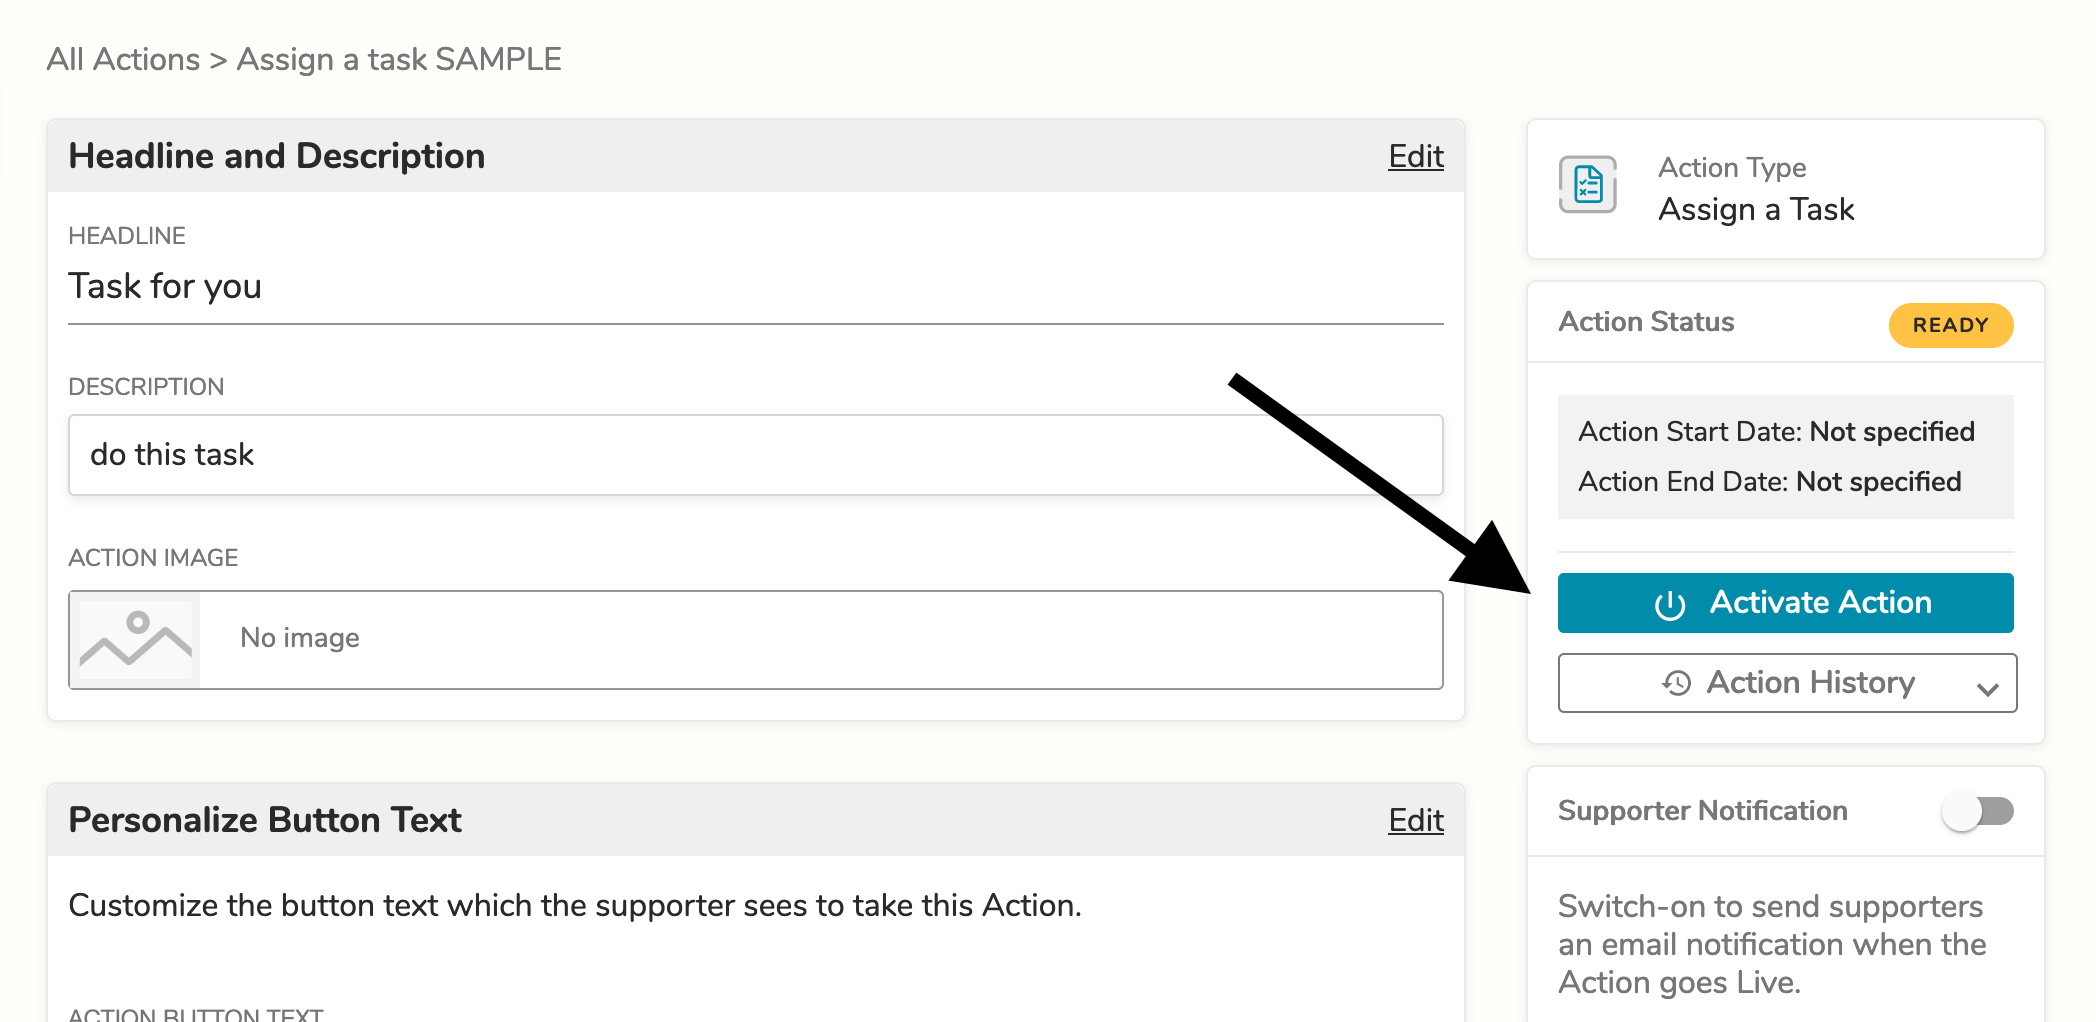
Activating an Action:
Once the Action is created, it will appear on the Action Landing Page. On this page, the admin can make edits, manually activate the Action, and can also deactivate an Action when it is no longer needed.
If an Action has been created but is still missing components (such as a sample message for email, text, or social sharing), it will be labeled 'Incomplete' in red on the Action Landing Page. Once the missing components are added, the Action will be ready to activate.
Editing an Action:
Note: Once an Action is activated, the Start Date and the List / Voter File it is linked to (if any) cannot be changed.
From the Client Action Page, click on the Edit button and all editable fields will be displayed.
![]()
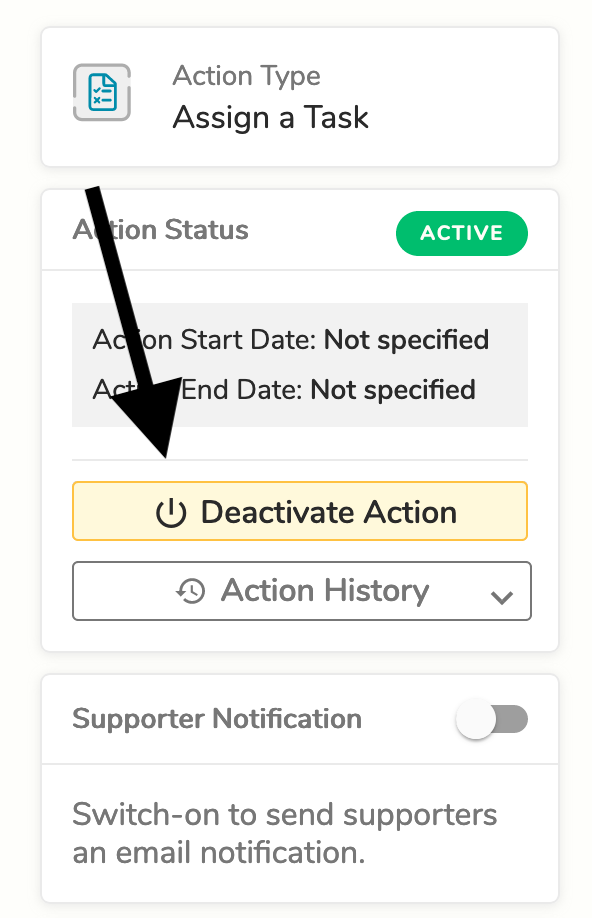
Deactivating an Action:
- Actions cannot be deleted, but they can be deactivated.
- Deactivated Actions do NOT display on the Supporter Action Page.
- When an Action is deactivated it appears in a list for reference at the bottom of the list of Actions on the Client Action Page.
- Deactivated Actions can be re-activated.
From the Client Action Screen, click on the dropdown arrow beside the Edit button, then click "Deactivate"

The "Deactivate" button can also be found on the Action Landing Page:
Changing the Display Order of Actions:
Live Actions appear in both the Client Action Page and the Supporter Action Page in the order in which they were most recently edited by the Client Admin.
Therefore, you can move any LIVE Action to the top of the list by editing it and saving, even if the edit is trivial.
You can also manually change the order of Actions by clicking on the order number next to an Action's name.
Comments
0 comments
Please sign in to leave a comment.